Fedora 25 to 26 Upgrade and VMware Workstation Pro

Today I upgraded my home office PC from Fedora 25 to Fedora 26. The upgrade went smooth with the exception of the proprietary NVidia drivers for my GTX 1060 not working at 1st boot. A quick run of `akmods –force` fixed that issue. VMware Workstation was another thing all together. It wouldn’t start at all from my launcher icon so I tried firing it up using the `vmware` command. Nothing. So, I took a look at the output of `dmesg` and saw the following:

[ 36.495620] vmware-modconfi[3031]: segfault at 68b0 ip 00000000000068b0 sp 00007ffcdf409158 error 14 in appLoader[d52286e000+ad000]
[ 229.686610] vmware[4147]: segfault at 68b0 ip 00000000000068b0 sp 00007ffd0a805698 error 14 in appLoader[3bc675f000+ad000]
[ 235.623006] vmware[4237]: segfault at 68b0 ip 00000000000068b0 sp 00007ffd939fcff8 error 14 in appLoader[186d087000+ad000]

So, it looked like the initial vmware-modconfig segfaulted at boot and then my 2 attempts to start up Workstation also segfaulted. I did a little bit of Google searching and come across several posts with varying information on the issue. I followed a couple of the articles I ran across and figured I’d document the exact steps required to get things up and running again. The issue looks to stem from Workstation expecting a specific version of GCC but Fedora 26 having an unexpected version. This fix is in no way supported by VMware and should be used at your own risk. It did work perfectly for me, but your results may vary.

Here are the exact commands I ran as the root user (either `su -` or `sudo -i`):

cp -r /usr/lib/vmware-installer/2.1.0/lib/lib/libexpat.so.0 /usr/lib/vmware/lib
cd /usr/lib/vmware/lib/libz.so.1
mv -i libz.so.1 libz.so.1.old
ln -s /usr/lib64/libz.so.1 .
cd /usr/lib/vmware/modules/source
tar xf vmmon.tar
tar xf vmnet.tar
cd vmmon-only/
make
cd ../vmnet-only/
make
mkdir /lib/modules/4.12.8-300.fc26.x86_64/misc
cp /usr/lib/vmware/modules/source/vmmon-only/vmmon.ko /lib/modules/4.12.8-300.fc26.x86_64/misc/
cp /usr/lib/vmware/modules/source/vmnet-only/vmnet.ko /lib/modules/4.12.8-300.fc26.x86_64/misc/
depmod -a

Once the depmod finishes up, you should be able to launch Workstation with the vmware command or via your application launcher. Credit to this article for most of the info above. My description of the steps are just a bit more verbose for those less CLI knowledgeable.

Posted in Fedora, Linux, VMware | 1 Comment

Building ccminer-cryptonight for Monero mining with NVidia GPU’s on Fedora 25

I was playing around with Monero crypto-currency mining this weekend and was able to easily get the CPU miner working on my Fedora 25 workstation. I wanted to use my GPU as well since I recently upgraded to an NVidia GTX 1060 and thought it’d be more efficient than CPU only mining. I only found GPU mining software for Windows on the Monero mining page but I did find this blog post after some Google searching. So, I followed the instructions and installed CUDA (I already had the proprietary NVidia drivers installed). I tried to compile the miner but it errored out complaining that “unsupported GNU version! gcc versions later than 5 are not supported!” I figured I was smarter than the system so I opened up the miner.h file and changed the following:
#if ((__GNUC__ > 5) || (__GNUC__ == 4 && __GNUC_MINOR__ >= 3))
to:
#if ((__GNUC__ > 9) || (__GNUC__ == 8 && __GNUC_MINOR__ >= 3))
It was brute force but it get me a bit further… Problem was, I could now get further into the compile but now there were tons of other errors spewing at me. Figuring there must have been some serious changes from the 4.x to 6.x versions of gcc and g++, I Googled to see if there was a way to force backward compatibility. I found the following flags:
-Xcompiler -std=c++98
I opened up the Makefile and added the above options to the following line:
$(NVCC) -g -O2 -I . -Xptxas "-abi=no -v" $(NVCC_GENCODE) --maxrregcount=80 --ptxas-options=-v $(JANSSON_INCLUDES) -o $@ -c $<
So it ended up looking like:
$(NVCC) -Xcompiler -std=c++98 -g -O2 -I . -Xptxas "-abi=no -v" $(NVCC_GENCODE) --maxrregcount=80 --ptxas-options=-v $(JANSSON_INCLUDES) -o $@ -c $<
I then re-ran make and the software compiled as expected. I tested it out by running:
./ccminer -o stratum+tcp://monerohash.com:3333 -u 42kiF5wF2hFBfUgfGHnkTEFp375wKoXeP6rJG7tf8MnhY5HNiHgAd7GP9GgSfPkqTf25R6qgBskDmHEpN2RRvxhd4BwXma8 -p 1
Its working as expected. Here is some output:
[2017-01-03 16:44:37] Pool set diff to 40541.1
[2017-01-03 16:44:37] Stratum detected new block
[2017-01-03 16:44:38] GPU #0: GeForce GTX 1060 3GB, 395.58 H/s
[2017-01-03 16:44:55] GPU #0: GeForce GTX 1060 3GB, 379.13 H/s
[2017-01-03 16:44:55] accepted: 28/28 (100.00%), 379.13 H/s (yay!!!)
[2017-01-03 16:45:07] Pool set diff to 65541
[2017-01-03 16:45:07] Stratum detected new block
[2017-01-03 16:45:08] GPU #0: GeForce GTX 1060 3GB, 398.29 H/s
[2017-01-03 16:46:09] GPU #0: GeForce GTX 1060 3GB, 396.61 H/s

If this helped you get your GPU miner up and running, feel free to send me some Monero. My wallet address is in the command above! Happy mining. 🙂

Posted in Cryptocurrency, Fedora, Linux, Monero | 1 Comment

Using Ruby to Call vRO Workflows via the REST API

There are a bunch of posts out there showing how to connect to the REST API but I found there were very few that actually showed something interesting happening. So, I figured I’d throw together an quick ruby script showing how to create a snapshot. I used the rest-client gem but other than that, its fairly straightforward. If you are wondering how to use the vRO API in general, there is a great intro over at vCOTeam.info. The workflow ID I am calling is a stock workflow so the ID should be the same on your appliance but the user/pass may need to change if you modified them. You’ll also want to update the server and vcenter variables. Finally, the VM ID is specific to my home lab. You will need to get the VM ID of the VM you want to snapshot.
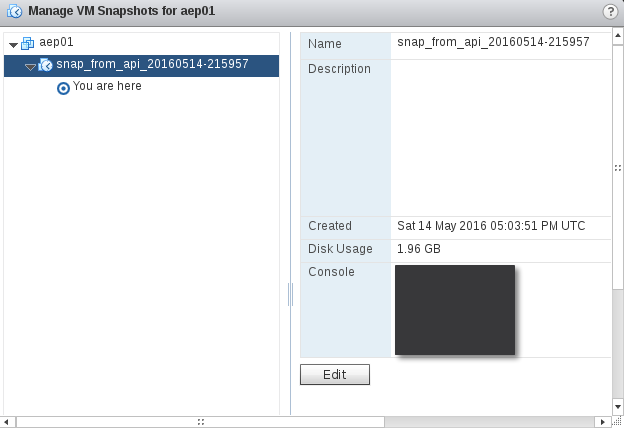
When you run the script, you should see a snapshot created on the VM defined in the script. Remember, the VM is defined by its vCenter ID, not its name. Here is a screenshot of the snapshot on a test VM in my lab.
snapshot image

You can download the script here.

#!/usr/bin/ruby

# Ruby script that connects to a VMware vRO server and kicks off a snapshot
# on a pre-defined vSphere VM. Could easily be extended to take an argument
# to get the VM.
#
# Written by Chris Adams, chris@linuxchris.com
# Written on 14 May 2016
#

require 'rest-client'
require 'openssl'
require 'date'

username = "vcoadmin"
password = "vcoadmin"
id = "BD80808080808080808080808080808053C180800122528313869552e41805bb1"
vm = "vm-43"
vcenter = "vcenter6.linuxchris.labnet"
server = "vco.linuxchris.labnet"
port = "8281"
apiuri = "/vco/api"

@debug = false

def buildUrl(username, password, server, port, apiuri, id)
# URL used to connect to the v(C)RO server
@url = "https://#{username}:#{password}@#{server}:#{port}#{apiuri}/workflows/#{id}/executions/"
puts "#{@url}" if @debug
end

def buildXml(vm, vcenter)
# Get current date/time so we can use it in the snapshot name
date = DateTime.now()
d = date.strftime("%Y%m%d-%H%M%S")
# Create the XML used to define the snapshot
@message = %Q( snap_from_api_#{d} false false )
puts "Message is: #{@message}" if @debug
end

buildUrl(username, password, server, port, apiuri, id)

buildXml(vm, vcenter)

client = RestClient::Resource.new(@url,
:verify_ssl => OpenSSL::SSL::VERIFY_NONE,
:accept => 'application/xml',
:content_type => 'application/xml')

result = client.post "#{@message}", :content_type => 'application/xml'

Posted in Automation, Ruby, Scripting, Sysadmin, vRO | Leave a comment

Adding an isolated network to my home lab

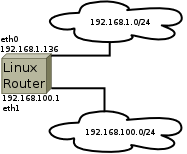
Last week I set up a Satellite server in my home lab so I could test out deploying systems via kickstart. I wanted to kickstart the VM’s using DCHP and PXE but I didnt want the DHCP server running on my single flat internal network (I know, I know I just haven’t had time to implement a couple more networks). I decided I’d set up a new isolated virtual network that I could use as my “deploy” network. My current network uses the 192.168.1.x so I decided I’d use a 192.168.100.x range. I created a new network on my hypervisor using VLAN ID 100, which is only only configured as a tagged VLAN on my lab switch. This ensures any traffic on the new virtual network can’t be seen by any of my existing traffic.
The next issue I had was, how could I route the traffic from the new 192.168.100.x network to the rest of my internal network and the Internet. Linux to the rescue. There are piles of router and security distros out there to accomplish this but I wanted something stock and simple. I decided to go with a minimal CentOS 6.x install. Red Hat or Fedora would also work for these instructions.
First thing we need to do is set up the interfaces on the VM. I have the NIC’s configured as follows:
eth0 – 102.168.1.136
eth1 – 192.168.100.1

router

Once the network interfaces are set up, all that needs to be done is enable routing on the VM. As root

add the following line to /etc/sysctl.conf:
net.ipv4.conf.default.forwarding=1

Then enable masquerading in iptables:
iptables -t nat -A POSTROUTING -o eth0 -j MASQUERADE

Save the iptables config:
service iptables save

You can now restart networking and iptables to make sure everything works:
service network restart && service iptables restart

That should be it. You now can configre any client on your deploy network to use 192.168.100.1 as a gateway. The clients will use the new Linux router to get to the 192.168.1.x network and the internet from there. Enabling DHCP on my Satellite server interface on the 192.168.100.x network will also not impact anything on my 192.168.1.x network.

This blog post is my own and is not endorsed or supported by my employer, Red Hat.

Posted in Home Lab, Linux, Sysadmin, Vurtualization | Leave a comment

Packstack install fails with Mongo Connection Error

Last night I was installing OpenStack Kilo using packstack via the instructions for CentOS 7 on RDO. I tried installing the stack using the following command, which should have resulted in a full OpenStack install on a single VM with the ability to configure external network access:

packstack --allinone --provision-demo=n

I ran into two separate issues. The 1st issue was that EPEL is disabled by default so you will have to manually add EPEL, which is fairly easy:

rpm -Uvh https://dl.fedoraproject.org/pub/epel/epel-release-latest-7.noarch.rpm

Once that was done, I re-ran the installer and ran into the following error:


packstack01.linuxchris.labnet_mongodb.pp: [ ERROR ]
Applying Puppet manifests [ ERROR ]

ERROR : Error appeared during Puppet run: packstack01.linuxchris.labnet_mongodb.pp
Error: Unable to connect to mongodb server! (packstack01.linuxchris.labnet:27017)
You will find full trace in log /var/tmp/packstack/20160108-105810-MPoFPc/manifests/packstack01.linuxchris.labnet_mongodb.pp.log
Please check log file /var/tmp/packstack/20160108-105810-MPoFPc/openstack-setup.log for more information

It turns out that the default config setting for Mongo is to listen only on the loopback interface (127.0.0.1) so I edited /etc/mongodb.conf and changed:

bind_ip = 127.0.0.1

to:

bind_ip = 0.0.0.0

I then restarted mongo

systemctl restart mongod

I was then able to re-run the packstack installer using the answer file generated from the previous run:

packstack --answer-file=packstack-answers-20160108-015811.txt

I think if you installed mongo and modified the config before running packstack, you could just run the original packstack command and it would succeed.

Posted in Linux, Sysadmin | Leave a comment

Configuring Infoblox in the home lab for vRO

Infoblox’s IPAM is an awesome product for IP address management, DHCP, DNS, etc. It is used by lots of companies and is often integrated with vRA/vRO.
Because of this, I have a local install of the IPAM in my home lab. Infoblox provides a 60 day trial license for customers to try out the product. Because I don’t really want to purchase a full license for my lab, I am forced to reconfigure the product every 2 months or so (depending on my needs at the time). Here are the steps to follow for resetting the license as well as updating vRO with the new config. As always, this is my blog and this is not endorsed or supported by VMware or Infoblox!

Steps:
Log into the appliance via the cli (default username/pass is admin/infoblox)
Run reset all licenses (will reboot)
Log in as admin/infoblox
Run set temp_license, select 8 add vNIOS license (appliance will reboot)
Upon reboot, watch the console and take note of DHCP IP address of appliance (requires DHCP)
Run set temp_license, select 2 add DNS Zone with Grid license
Wait a minute or so for services to restart and then log into UI at https://DHCP-IP
Agree to the license
Select IPv4 Network and Stand Alone Appliance
Set the IP/hostname
Set a password
Set Time/Date
Click Next for support options
Review settings, click finish
Click Yes to ok a restart of appliance (will reboot, again)
Log into the UI at https://PERM-IP
Go to data management
Add->Network->IPv4 Network
Enter Network range to be included in IPAM, check “Disable for DHCP”
Click Next, Next, Save and Close
You will see the new network listed under Data Management->IPAM->List View
Select the new network
Create a reservation for any IP’s already in use (my DHCP server uses 1-40)
Select Add->Range->IPv4
Click Next
Add the starting and ending IP, click next
Click next, next, finish

The following options are only required if you are using the Infoblox vRO modules provided by VMware PSO (CCC).
Back in the IPAM view, check the box next to the network you create and select Edit from the list of actions on the right
On the IPv4 DHCP Options Tab:
Click “Override” on Routers and add a route for the network being defined
Click “Override” on Domain Name add a domain name for the network being defined
Click “Override” on DNS Server and add DNS Servers for the network being defined
On the dropdown in “Custom DHCP Option” select “fqdn (81) string” and enter you domain name in the text box.
Click on Save and Close

Go to Grid->Grid Manager
On the right menu select Certificates->HTTPS Cert->Generate Self-Signed Certificate
Enter 365 for Days Valid and click ok
Click Ok for the warning
Click Ok to close the window
Logout and refresh the login page, you will need to re-accept the new cert
In vRO, run Library->HTTP-REST->Configuration->Update a REST Host
Select the infoblox host click next
Enter host properties click next
Enter proxy info if you need it, click next
Select auth type (Basic is used for standard local to the NIOS appliance logins)
Enter the user credentials
Select if you want SSL verification (I don’t because I’m using a self signed cert)
Click submit
Test the IPAM by running the IPAM->Infoblox->Helpers->Get NextAvailable IP workflow.
Select the host and enter the network, CIDR and API Version
Click Submit
You should get the next available IP reported in the Logs tab.

Posted in Automation, Home Lab, Sysadmin, vRO | Leave a comment

vRO Workflow to Get a DV Portgroup By Name

I recently needed a vRO workflow to get a distributed port group object to perform some work on. I had access to the name of the port group but I couldn’t find a workflow that would allow me to get the port group object by a name without manual intervention. I was writing an automated process so I needed the lookup to run without intervention.

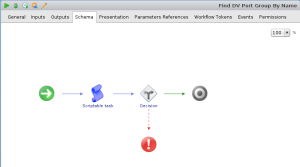
What I wrote does the following:
1) Looks up the portgtoup on a name passed as a string and a DV Switch object.
2) Returns a DV Portgroup as a VC:DistributedVirtualPortgroup object.
3) Errors out if a port group is not found.

vRO Workflow Schema:
WorkflowSchema

Workflow Input and Output:
WorkflowInputOutput

vRO Script Contents:
ScriptContents

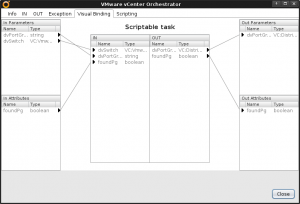
Script Visual Binding:
ScriptBinding

Using this workflow, you can easily get a port group from a distributed virtual switch. You can download the workflow here. As always, this post is my own and not endorsed or supported by VMware.

Posted in Automation, VMware, vRO | Leave a comment

Building NVidia Driver 340.76 with Linux 4.0.4 on Fedora 21

This evening I updated Fedora 21 on my Thinkpad W510 laptop and the kernel upgrade brought the laptop to version 4.0.4. The previous 3.x kernel worked perfectly with my Nvidia drivers but installing the Nvidia drivers in the 4.0.4 kernel failed. I was unable to find anything online via Google or the Nvidia web site. I looked at the Nvidia install log (/var/log/nvidia-installer.log) and noticed that the kernel module build was failing on “write_cr4.” After a bit of Google searching I found a post on the Nvidia developer forums about some issues with read_cr4 and write_cr4 being changed to __read_cr4 and __write_cr4 in Linux 4.x kernels.
I usually update my Nvidia drivers by running ‘./NVIDIA-Linux-x86_64-340.76.run’ but adding a ‘-x’ to the command extracts the full package so the contents can be viewed, and in this case modified. All that needs to be done is edit the file kernel/nv-pat.c in the extracted directory from:
{
unsigned long cr0 = read_cr0();
write_cr0(((cr0 & (0xdfffffff)) | 0x40000000));
wbinvd();
*cr4 = read_cr4();
if (*cr4 & 0x80) write_cr4(*cr4 & ~0x80);
__flush_tlb();
}

static inline void nv_enable_caches(unsigned long cr4)
{
unsigned long cr0 = read_cr0();
wbinvd();
__flush_tlb();
write_cr0((cr0 & 0x9fffffff));
if (cr4 & 0x80) write_cr4(cr4);
}

To:
{
unsigned long cr0 = read_cr0();
write_cr0(((cr0 & (0xdfffffff)) | 0x40000000));
wbinvd();
*cr4 = __read_cr4();
if (*cr4 & 0x80) __write_cr4(*cr4 & ~0x80);
__flush_tlb();
}

static inline void nv_enable_caches(unsigned long cr4)
{
unsigned long cr0 = read_cr0();
wbinvd();
__flush_tlb();
write_cr0((cr0 & 0x9fffffff));
if (cr4 & 0x80) __write_cr4(cr4);
}

You can then run ‘./nvidia-installer’ in the extracted directory as root and the module will build just fine. I am assuming the next release of the Nvidia driver will contain a fix but until then, this will get you working if you have a 4.x kernel and the driver fails to build.

Posted in Laptop, Linux | 2 Comments

Installing Fedora 21 and ESXi 5.5 on my new Shuttle DS81

As I previously wrote, I recently assembled a new workstation for the home lab that I will be using as both a Linux and ESXi host. I’ll be using it as an admin workstation while not traveling (Linux) and then leave it running as a hypervisor in my lab while I’m on the road (ESXi).

Installing ESXi:
Since I had a few other ESXi hosts on the network, this install was very easy. I put one of my other hosts into maintenance mode and shut it down. I then took the USB stick that has the ESXi install on it and cloned it. My existing ESXi usb disk was /dev/sdd below and the new ESXi install disk was /dev/sdc. This only works if you are using the same size disk (or if the newer disk is a larger size). Here are the steps I used (as always, PLEASE be careful with dd. It can erase your hard drive if you are not careful!).

sudo dd if=/dev/sdd of=/home/chris/esxi.img bs=1M
sudo dd if=/home/chris/esxi.img of=/dev/sdc bs=1M

Once that was done, I just put the newly imaged USB disk into the new computer and booted to the USB drive. It came up without issue so on the ESXi console I logged in and selected “Reset System Configuration (Factory Reset).” The system rebooted and I configured it like any other ESXi host in my environment. Here is what it looks like in the vSphere client:

Mininix ESXi


Installing Fedora:
This was fairly straightforward, I just wrote the Fedora live ISO to a USB stick on my mac and booted the system from the USB stick. The OS was installed to the 128 GB mSATA disk I installed and everything went smooth. Fedora’s install instructions are here if you need them. After the OS was installed, I ran the following commands to get flash, chrome, silverlight and java set up and running. I also installed cinnamon and xfce since I really don’t like Gnome 3:

sudo yum localinstall --nogpgcheck http://download1.rpmfusion.org/free/fedora/rpmfusion-free-release-21.noarch.rpm
sudo yum localinstall --nogpgcheck http://download1.rpmfusion.org/nonfree/fedora/rpmfusion-nonfree-release-21.noarch.rpm
sudo yum update -y
sudo yum -y install vlc yum-plugin-fastestmirror icedtea-web wget
sudo rpm -ivh http://linuxdownload.adobe.com/adobe-release/adobe-release-x86_64-1.0-1.noarch.rpm
sudo rpm --import /etc/pki/rpm-gpg/RPM-GPG-KEY-adobe-linux
sudo yum -y install flash-plugin
sudo yum localinstall --nogpgcheck https://dl.google.com/linux/direct/google-chrome-stable_current_x86_64.rpm
sudo yum -y install @cinnamon-desktop @xfce-desktop
wget https://kojipkgs.fedoraproject.org//packages/pipelight-selinux/0.2.1/2.fc21/noarch/pipelight-selinux-0.2.1-2.fc21.noarch.rpm
sudo dnf install ./pipelight-selinux-0.2.1-2.fc21.noarch.rpm
sudo pipelight-plugin --update
pipelight-plugin --help
pipelight-plugin --enable silverlight5.1
pipelight-plugin --enable silverlight5.0
pipelight-plugin --enable flash

Finally, I installed docker and disabled the local firewall:

sudo yum install docker -y
sudo systemctl start docker
sudo systemctl enable docker
sudo systemctl disable firewalld
sudo systemctl stop firewalld

The final thing I needed to do was install the vCO client which is easily done by downloading the installer from the vCO appliance web page. When I was done, I had a desktop that looks like this:

Mininix Desktop

Posted in ESXi, Home Lab, Linux, VMware, Vurtualization | 2 Comments

New Fedora 21 and ESXi Host in the homelab

A while back I wrote about setting up an old Toshiba laptop we had laying around as a workstation to manage my VMware environment including vCO (now named vRO). That laptop has been working well but I wanted something a bit more powerful to use as a permanent Linux workstation as well as possibly dual boot into ESXi. There are a myriad of choices out there but I wanted something small and quiet but still able to house an SSD or two, have 2 NIC’s and be as quiet as possible.
I decided on a Shuttle DS81. The computer is very small (the size of a small paperback book and about as silent as you can get. It is capable of housing a bunch of different low power Intel CPU’s from Celeron’s to i7’s. It can also have up to 16 GB RAM, a SATA drive, an mSATA SSD and includes 2 built in NIC’s. Everything on my wish list. Here is how I configured it:
Shuttle DS81 Barebone Chassis
Intel Celeron G1820 CPU
16 GB Crucial RAM (2 x 8 GB)
128 GB Crucial mSATA SSD Drive (Linux Install)
16 GB Sandisk Crusier Fit USB Drive (ESXi Install)

Note that I didn’t buy any of these directly from the manufacturer. They are available much cheaper through Newegg and Amazon. I had a keyboard/mouse laying around and picked up a used 22″ Dell monitor on a local Facebook yard-sale page for a steal. The system works great. I’m very happy with the performance, sound output and size. In the next post I will describe what I did to get Fedora and ESXi installed and working.

Posted in Home Lab | 1 Comment