When working on VM’s deployed by vRA, vRO needs to operate on a VM object. This scriptable task will find a VM object by searching the vCenter inventories by the input VM name. The result will be a single VM object. The task will fail if anything other than a single powered on VM is found with the name. SRM placeholders are excluded by checking if the powerstate is not on.
// Input is vm_name (string), output is vm_object (vc:virtualmachine)
// Needs to find only 1 VM matching the name in the inventory
// This version skips powered off VM’s (SRM placeholders)

var qry = "xpath:name='" + vm_name + "'";
var vms_found = Server.findAllForType("VC:VirtualMachine", qry);
var good_vms = [];

System.log("Number of VM's found: " + vms_found.length);
for(var i = 0; i < vms_found.length; i++){
    System.log("vCenter is " + vms_found[i].parent.parent);
    if(vms_found[i].state == "poweredOn"){
        System.log("Status is " + vms_found[i].state) + " adding to good vm's array.";
        good_vms.push(vms_found[i]);
    }
}

if(good_vms.length == 1){
    vm_object = good_vms[0];
} else {
    throw("Number of powered on VM's found with the name " + vm_name + " is not 1. Exiting!");
}
Create a workflow using this and call it during Machine Provisioned Post in vRA 8.x to dump all the properties of the VM being deployed. Can be helpful troubleshooting builds.
function dumpProperties(props,lvl){
         var keys = props.keys;
         var prefix = ""
     for (var i=0; i<lvl; i++){
                   prefix = prefix + "";
          }
          for (k in keys){
                 var key = keys[k];
                 var value = props.get(keys[k])
                 if ("Properties" == System.getObjectType(value)){
                  System.log(prefix + key + "[")
                  dumpProperties(value,(lvl+2));
                  System.log(prefix+ "]")
                 } else{
                   System.log( prefix + key + ":" + value)
                 }
                 }
}

dumpProperties(inputProperties, 0);

var customProps = inputProperties.get("customProperties");
var resourceNames = inputProperties.get('resourceNames');
var tag_data = inputProperties.get("tags");

var vmname = resourceNames[0];
System.log ("VM Name is: " + vmname);
var addresses = inputProperties.get('addresses')
var IPaddress = addresses[0][0];

System.log("IPaddress is: " + IPaddress);
System.log("Custom Properties length is: " + customProps.length);

for(var i in customProps){
    System.log("Custom Property Key: " + i + ". Value is " + customProps[i]);
}

System.log("Input Properties length is: " + inputProperties.length);

for(var i in inputProperties){
    System.log("Input Property Key: " + i + ". Value is " + inputProperties[i]);
}

for(var i in tag_data){
    System.log("Tag is: " + i + ". Value is " + tag_data[i]);
}

System.log("Network ID is: " + inputProperties["subnetIds"]);
I recently got a few new SuperMicro servers for the home lab along with a 10 GbE Cisco switch and an updated Synology NAS. Look for some posts in the coming weeks on my planning and deployment of the new lab. I’ll also have some videos on the process posted to my YouTube channel.
In my previous post I described how to use vRA 8’s native functionality to apply an NSX-T tag to a VM’s logical port. In this post I will describe how you can use vRA’s ABX platform to create a python script to apply a tag to VM object in NSX-T. Many customers I have worked with prefer to apply tags at the VM level instead of the logical port level so I created this script to enable those customers to continue working as they always have. There will be screenshots in this post but you can access the script from my github page here.
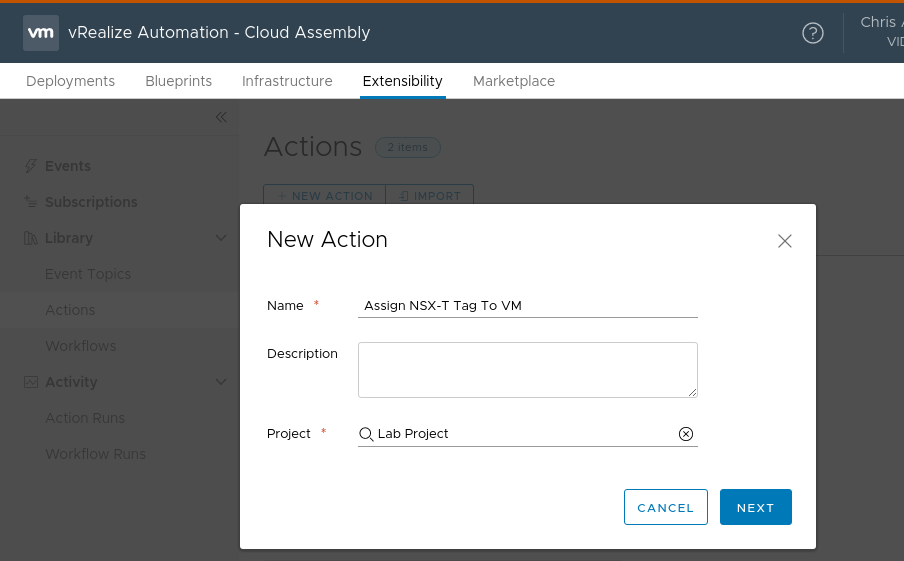
The 1st thing we need to do is create a script definition in vRA. To do this, navigate to Cloud Assembly->Extensibility->Actions and click the new action button. Give the new action a name and associate the action with a project. Click next to create the action.
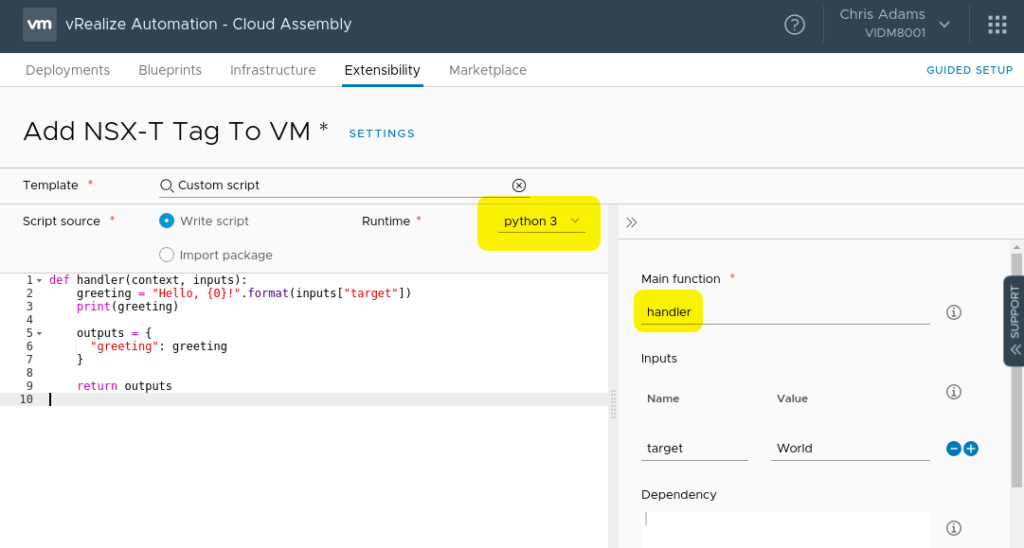
After clicking next you will be presented with the script definition editor. There are a couple of important things to note in here. As highlighted below, we will be creating a python application (the other option is Node.js). Secondly, we are using the default “handler” function as our main function. You can think of this as main() in a C program or simply as the place our program will start from. All of our properties and deployment information will be passed to the handler function at execution time.
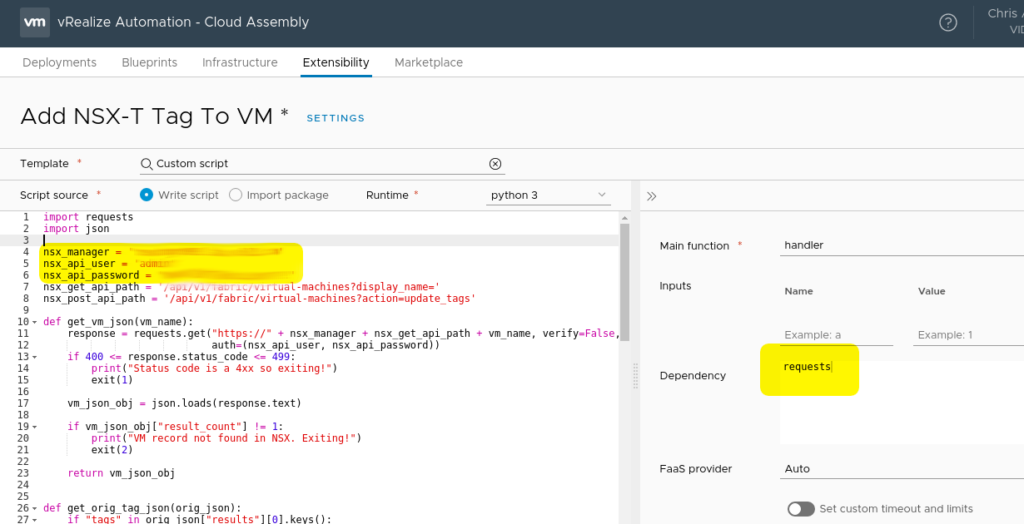
The default code in the script definition will simply print “Hello, World!” when the script is executed. Kinda fun but not really helpful for out exercise. At this point you can go ahead and get the add_nsx-t_tags_to_vm_abx.py script from the NSX-T python section of my github page. Take the contents of the script and paste it into the script definition pane (make sure to erase or overwrite the hello world code). Edit the script definitions to reflect your nsx manager, nsx manager user and password. You will also see that there are 2 import statements at the top of the script. JSON and requests are required for this script. Since the requests library isn’t included with the python environment in ABX, it needs to be pulled at runtime so we add a dependency on the right side of the page. See the screenshot below for an example.
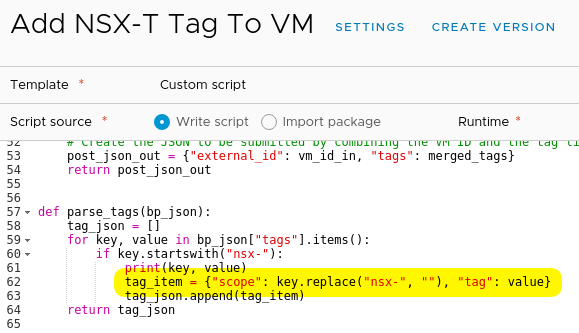
We are almost done with the script definition but its important to point out that this script expects tags to be defined in a specific format. The tags should be added to vRA in the format of nsx-tag:value. So, if the tag is defined as nsx-os:linux, the VM will be tagged in vCenter with nsx-os:linux and in NSX-T as os:linux. This is useful so you can easily see in vCenter that there is a NSX tag applied to the VM. The script strips off the nsx- portion of the tag name before adding the tag to the VM in NSX. This is accomplished in the parse_tags function. If you want to change this behavior, you can change the line highlighted below.
Now that we have the script definition done, click on the save button and then close.
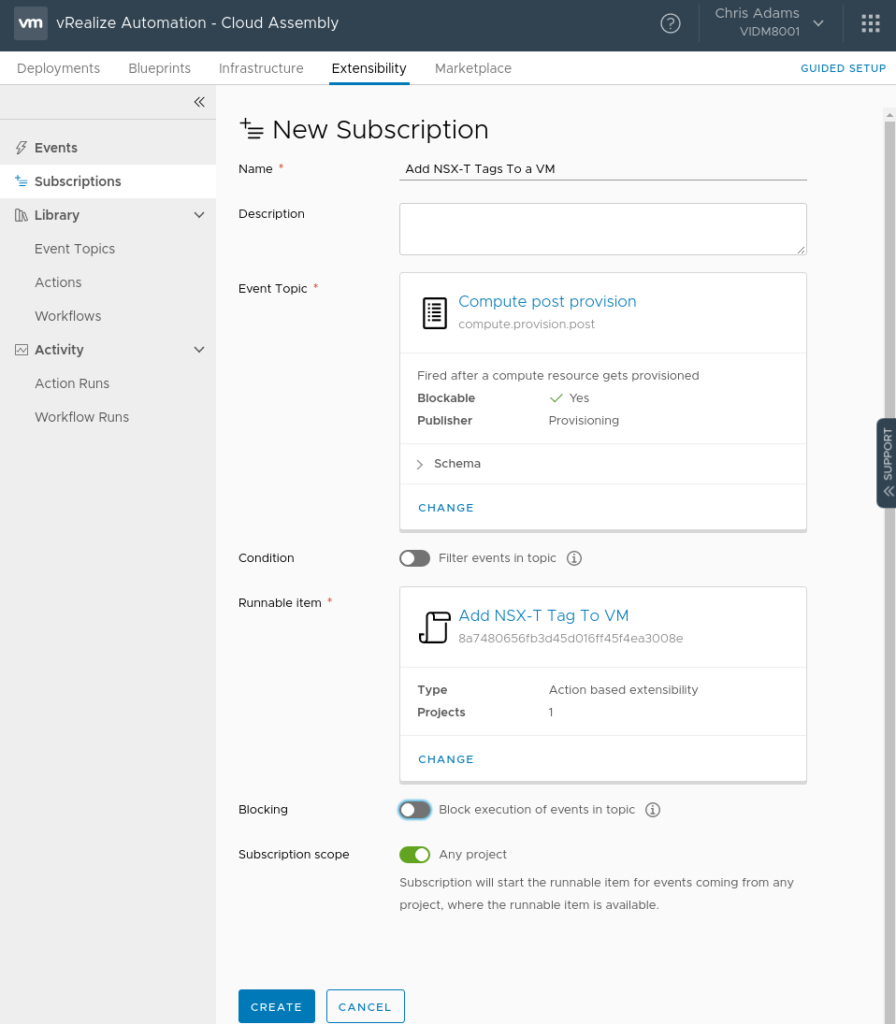
We now have to create a subscription to execute the script when we provision a VM. Navigate to Cloud Assembly->Extensibility->Subscriptions and click the “New Subscription” button. Give the subscription a meaningful name, set the event topic to “Compute post provision.” This will ensure the tag is applied after the VM is provisioned and will be in the NSX-T inventory. Set the runable item to be the script we created. Click the “Create” button.
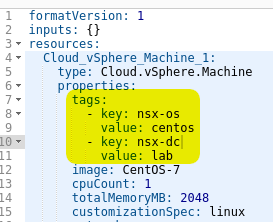
We are now ready to ensure our blueprint has the proper tag definitions. In the vSphere Machine properties we will add a tags: definition containing our nsx- tags. In the following screenshot I have an operating system (nsx-os) and datacenter (nsx-dc) tag defined. You can use whatever tags your environment uses. As long as it has nsx- in the tag name, it’ll apply.
Save the blueprint and test a deployment.
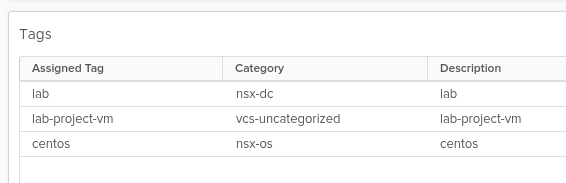
When the deployment is complete you should see the tags applied to the VM in vCenter with the nsx- name still in place so we know the VM has some tags in NSX.
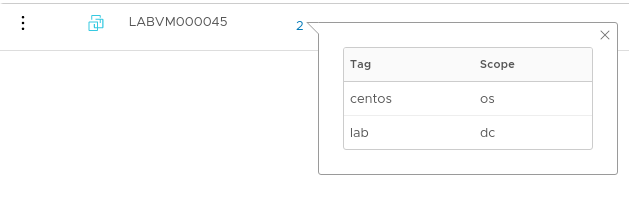
In NSX-T you should see the VM in the inventory and it should have the tags that were defined in the blueprint but this time without nsx- in the tag name.
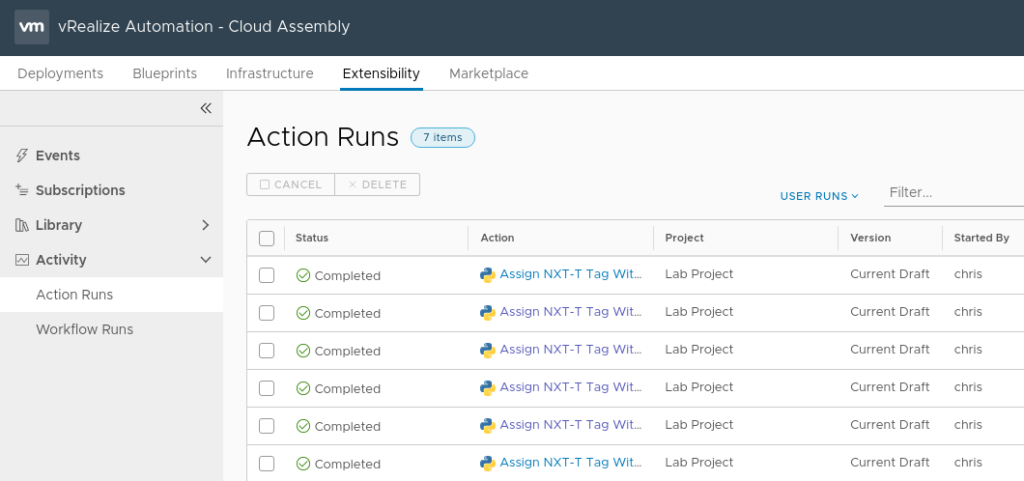
If anything went wrong, you can review the script run and examine the script output in the “Action Runs” tab in the Activity section of Cloud Assemblies extensiblity section.
Hopefully this post was helpful. If you run into any issues or have questions/comments, please leave them below.
Applying an NSX-T tag to a VM during a vRA 8 deployment can be accomplished in two different ways. The 1st route is to use vRA’s native tagging functionality in your blueprint. The other is to use ABX or vRO to tag the VM during the provisioning lifecycle. I’ll discuss the latter option in my next post. In this post, I’ll be walking through using the native tagging functionality in a vRA blueprint.
As you may know, vRA 8 support a variety of tags. The ability to apply vRA tags, vSphere tags and NSX tags without having to write complex integration code is an awesome feature.
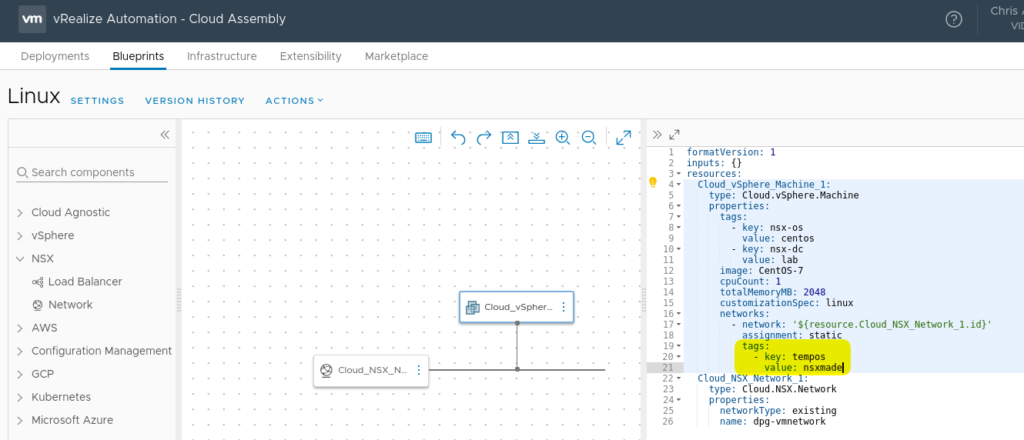
Creating a tag with vRA in your blueprint is fairly easy and follows tag constructs seen in other sections of the blueprint YAML. You just need to add the tag definition to your existing blueprint. The tag is added to the netwoks/network section of the vSphere Machine. The highlighted area in the screenshot below defines a tag of nsxmade with a value of tempos.
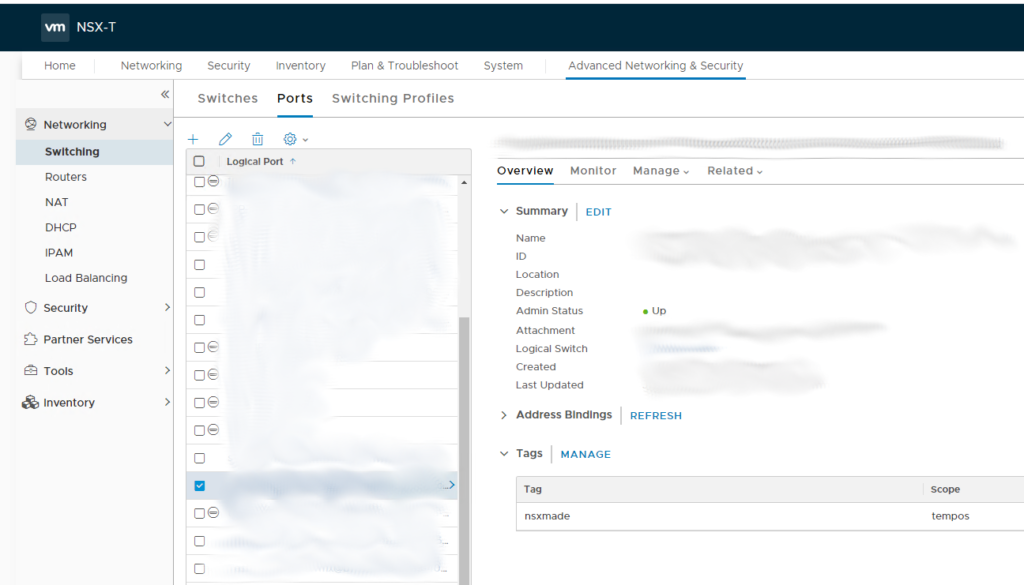
The way vRA 8’s tagging with NSX-T works is it creates a tag on the VM’s logical port on the NVDS. An important thing to note here is that you will not see this tag on the VM in the inventory screen of NSX manager. You can see the tag by going to the advanced networking & security section of NSX manager -> switching -> ports. Then select the port associated with the VM and you should see a “Tags” section.
With dynamic membership in security groups, you can easily add these VM’s to multiple groups depending on the tags you apply.
I was at a recent customer engagement and was asked to provide a list of all the tags in use in their NSX-T environment. I wrote them a solution using vRO and the NSX-T API but thought it would be useful to provide a quick port in Python so others could do it if they were not a vRO shop. Click here for a link to the code on my github.
Here is a past of the relevant code if you just want a quick look:
import requests
import json

nsx_manager = 'nsx_manager_fqdn'
nsx_api_user = 'admin'
nsx_api_password = 'super_secret_password'
nsx_api_path = '/api/v1/fabric/virtual-machines?included_fields=display_name,guest-info'

response = requests.get("https://" + nsx_manager + nsx_api_path, verify=False, auth=(nsx_api_user, nsx_api_password))

if 400 <= response.status_code <= 499:
    print("Status code is a 4xx so exiting!")
    exit(1)

tag_arr = []
json_obj = json.loads(response.text)

# Step through the results and only work on records with tags defined
for vm in json_obj['results']:
    if 'tags' in vm:
        for tag in vm['tags']:
            tag_arr.append(tag['tag'])

# Remove duplicate tags
tag_arr = list(dict.fromkeys(tag_arr))

# Print the list of tags in use
print(tag_arr)
I was in the market for a new laptop and was planning on just going with the newer version of my current laptop. I have had a Lenovo t460s for a couple of years and have been generally happy with it with the exception of the low end graphics chipset. I looked into a t480 since that was similar but allowed for dedicated NVidia MX150 graphics but while researching my options I came across a great deal on a Dell XPS 15 9570. It met all my needs, 14″-15″ display, Core i7 CPU, ability to have >16GB RAM and had a NVidia GTX 1050 GPU (even better than I had originally looked for). The only issue was there are many horror stories out there of people trying to get Linux running on the laptop. After doing a bit of research, I thought I could possibly piecing together a few tutorials and get Linux running on it.
I have almost always used Fedora or OpenSuse on my laptops but since Dell has been supporting Ubuntu on the XPS 13 line, I figured I’d step out of my normal OS and give Ubuntu a try.
These are the things I had to do to get the system running Ubuntu. This left me with a Linux only laptop, if you want dual-boot with Windows, you’d probably need to figure out another way (or just install Windows manually before installing Ubuntu.
1) Change the BIOS setting to disable secure boot
2) Change the BIOS setting for the onboard SATA controller to disable RAID
3) Boot the Ubuntu installer with the grub linux boot options to include ‘nouveau.modeset=0’
4) From the installer live environment, run fdisk to clear the hard disk
5) Reboot the computer and restart the installer (remember the nouveau.modeset=0)
6) Install Ubuntu as normal
7) Once the system is installed and booted into the fresh install, run an update (ap-get update && apt-get upgrade)
8) Run the following command to set everything else up: bash -c "$(curl -fsSL https://raw.githubusercontent.com/JackHack96/dell-xps-9570-ubuntu-respin/master/xps-tweaks.sh)"
All credit for the above script goes to: JackHack96.
That’s it, after the script is run you will reboot one more time and everything will “just work.” I went ahead and installed KDE Plasma and a bunch of applications I use frequently like VMware Workstation, Slack, Spotify, Atom and Steam without issue. I then fired up Civilization 6 and it plays great on the laptop. My old laptop couldn’t even load the game. I’ve only had the laptop for a couple days but I’m liking it so far.
I recently had to install a couple of greenfield environments for a customer that has a very complex network layout. 100’s of VLAN‘s on their network that are consumed by vSphere VM Port Groups on Distributed Switches. Luckily the customer has a standard naming and VLAN ID scheme so I was able to create a list of the VLANs and then run the list through PowerCLI to get all the Distributed Port Groups created without much work. Manually creating them would have taken forever and exporting the old config was not something the customer wanted to do since there were a bunch of legacy VLANs in the existing environment that were no longer needed. Here are the PowerCLI commands to create VLAN backed port groups on a DVS. The DVS name is NEW-DVS and the CSV file is located at c:\networks.csv.
$csv = Import-Csv c:\networks.csv -Header @("name","vlan")

foreach ($rec in $csv) {

   Get-VDSwitch -Name "NEW-DVS" | New-VDPortgroup -Name $rec.name -VLanId $rec.vlan

}
Here is a sample .csv contents as well. This will create 5 port groups on VLAN ID’s 2001-2005:
DPG2001, 2001

DPG2002, 2002

DPG2003, 2003

DPG2004, 2004

DPG2005, 2005
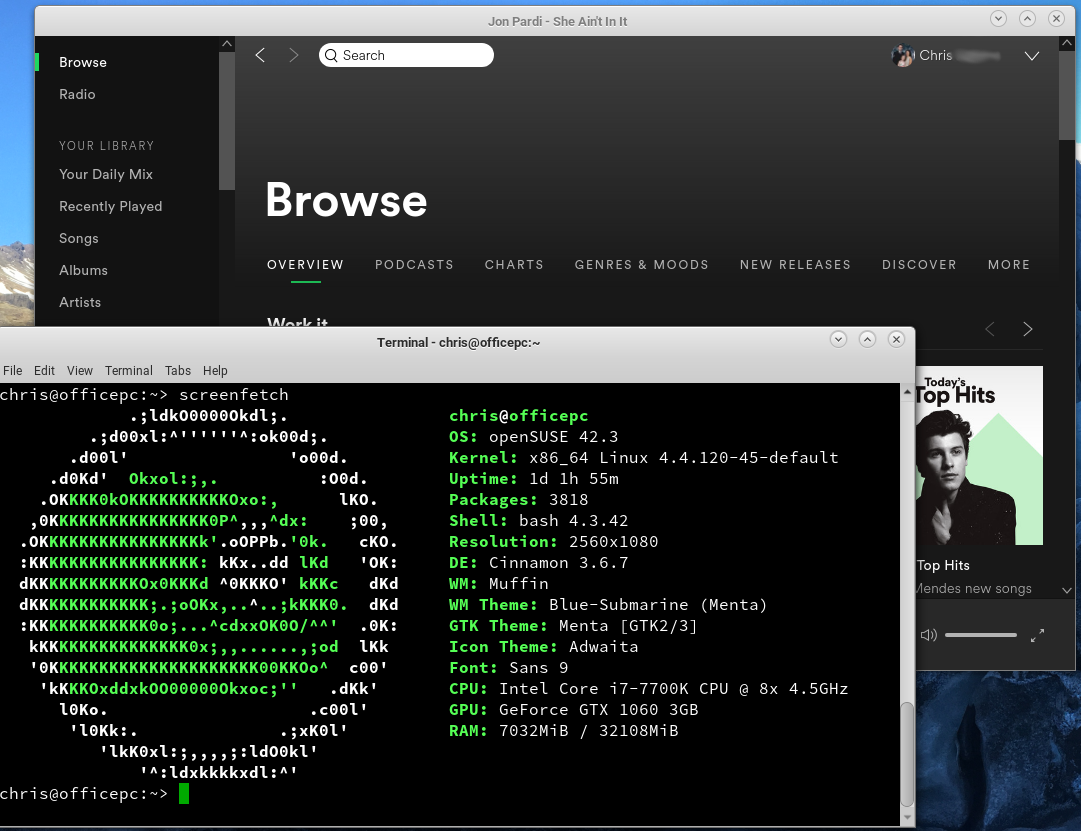
I recently switched from Fedora to OpenSuseLeap on my home office PC. I’ve been a Fedora user for a couple of years but had primarily used SUSE for a long time prior to that. Purchasing a new M2 SSD for my PC gave me the chance to get back to my SUSE desktop roots and switch back. Everything worked flawlessly with the exception of installing the Spotify desktop client. I use Spotify all day while working from home and hate having to keep a Firefox window open for the web player. Here is how I got it up and running. Its a bit hacky and really should be easier to do but it works.
1st thing you need to do is follow the instructions at this github page to install the Spotify bits. It will install but if you try and run /usr/bin/spotify, it’ll error out on missing libraries. I did a bit of searching for package requirements and couldn’t find much out there so I started looking at the specific error. It turns out that Spotify wants some libraries that aren’t available in Leap 42.3 packages so we have to get them elsewhere. Luckily, Steam uses the very same libraries we are missing! I installed Steam because I love playing Civilization 6 on Linux but it just happens to also help me load Spotify.
Here is what you need to do to get the libraries properly linked so Spotify will load.
Since I work with different customers all the time, I am constantly testing things for work in my home lab. When customers and co-workers hear about my lab they often ask what hardware is in the lab. I’m putting this post together so I can point people here and say “this is it.”
The current version of my lab consists of 6 ESXi hosts, 2 Linux hosts, 1 Synology NAS, a Netgear 48 port switch and a Ubiquity Edgerouter X.
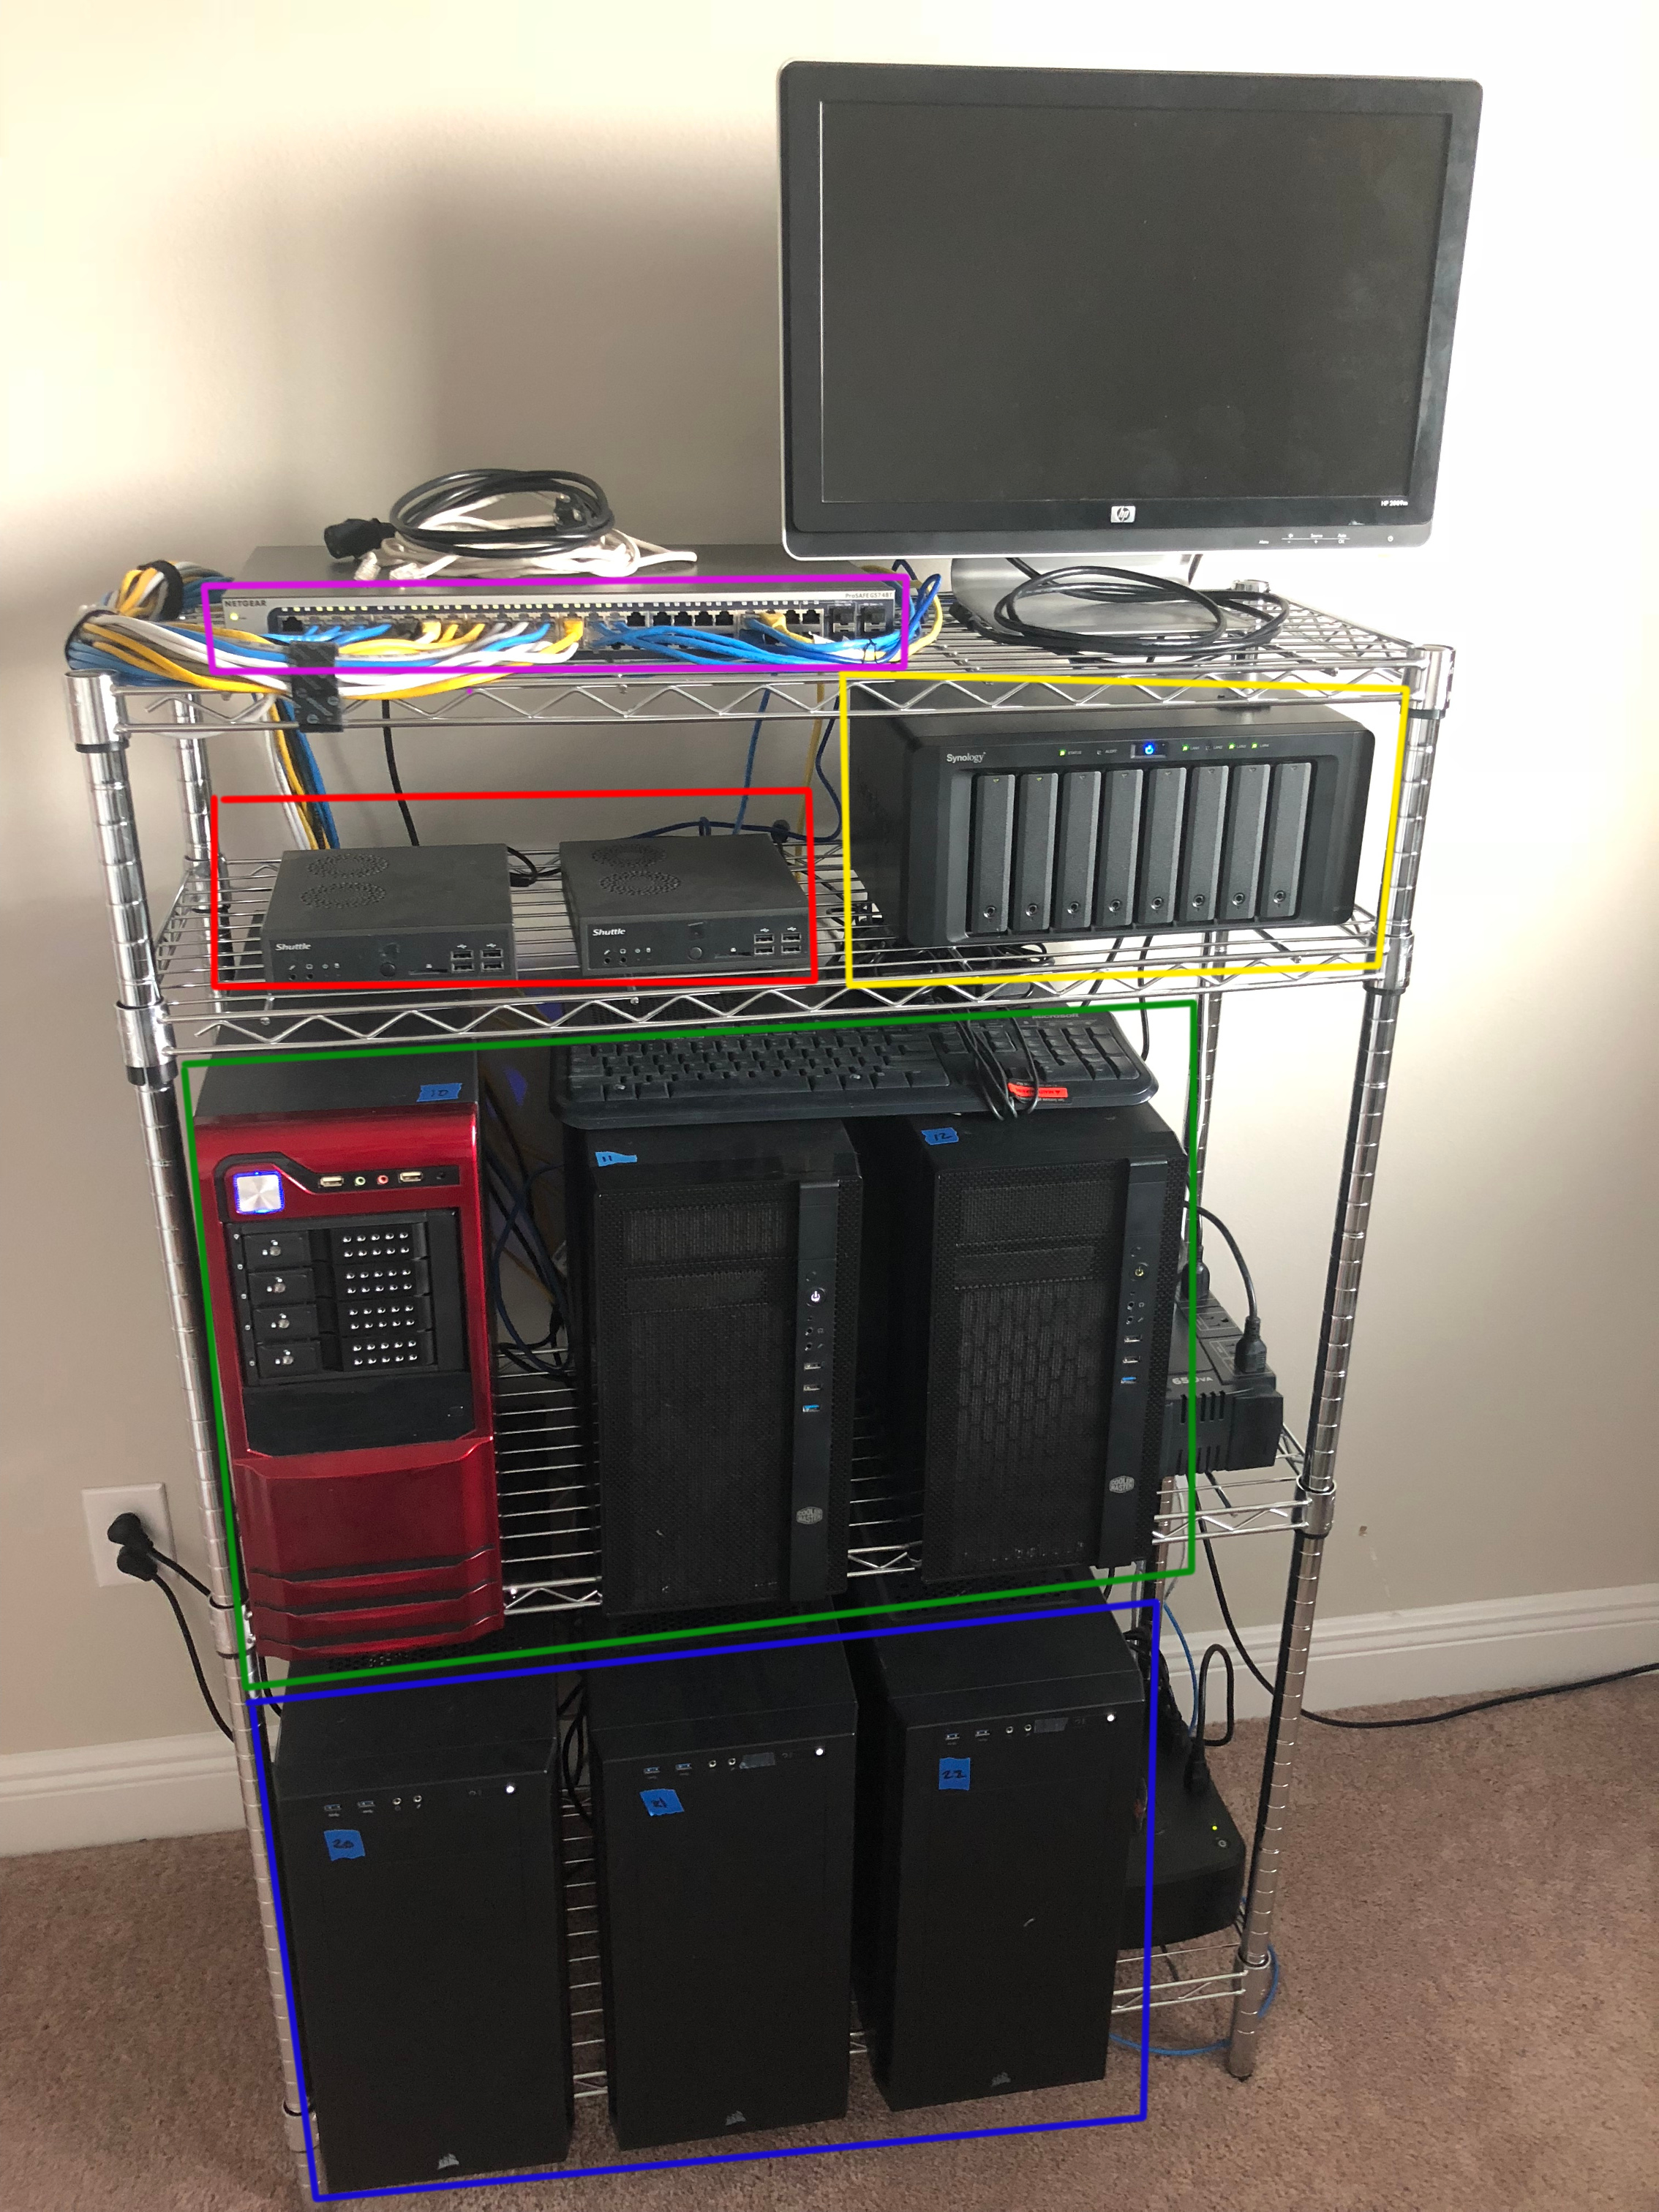
In the following picture, the items are as marked by colored areas as follows:
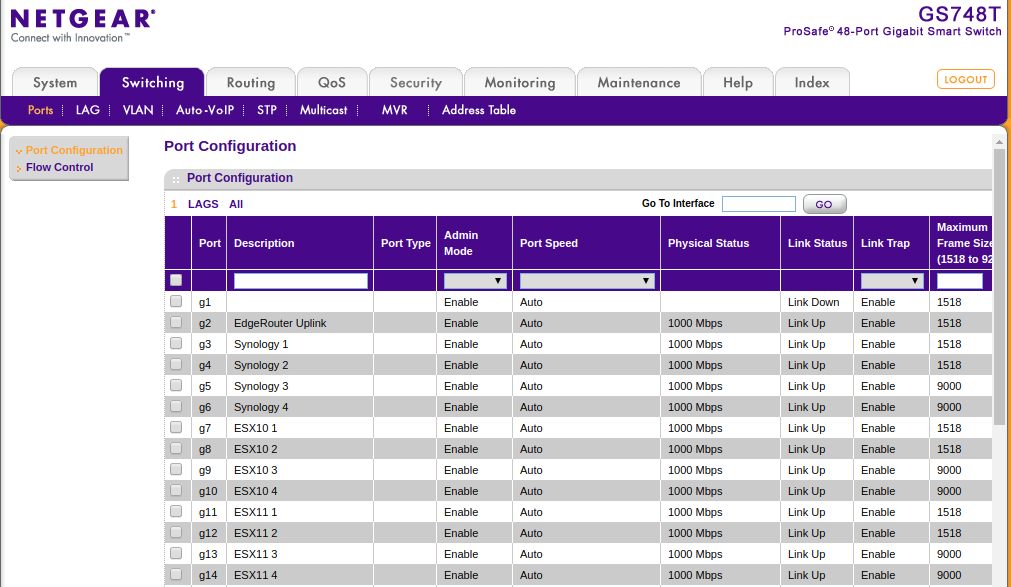
Purple – 1 x Netgear 48 Port Gigabit Switch, Model GS748T
Red – 2 x Shuttle DS81 Hosts Running CentOS Linux. Each host has a Celeron CPU and 16 GB RAM.
Yellow – 1 x Synology DS1815+ 8-bay NAS
Green – 3 x ESXi 6.0 Hosts in my management cluster. Each host has a Core i5 CPU, 64 GB RAM and 2 x Intel Dual port Gigabit NICs.
Blue – 3 x ESXi 6.0 Hosts in my workload cluster. Each host has a Core i5 CPU, 64 GB RAM, 2 x Intel Dual port Gigabit NICs as well as 1 x 128 GB SSD & 1 x 500 GB hard drive for vSAN.
All of the hosts in the management and workload clusters are the same hardware. Each has an Intel CPU, 64 GB RAM (4 x 16 GB) and two dual port Intel NIC’s.
The Linux hosts are re-purposed from the previous iteration of my home lab. I use them for Openstack and Docker testing and integration.
All of the ESXi hosts connect to the Synology NAS via NFS and store all VM’s on a single 10 TB volume.
Each of the 3 hosts in the compute cluster take part in a minimal vSAN config that I use just for testing. I don’t usually store anything permanent there since it is 100% unsupported hardware. 🙂
Finally, I have a single switch that connects all the components. I have several VLAN’s designated for simulating specific network segments as well as providing a means to use VXLAN with NSX.
Everything has connectivity back to my home network and the internet via a Ubiquity Edgerouter X in a patch box where my FIOS Internet router is located.
Sometime in the future I’ll show the software in use but it’s fair to say it’s VERY VMware and Linux focused. 🙂